

استفاده از ابزارهای توسعهیافته امروز روند آزمایشها و مطالعات پژوهشی و تشخیصی را سرعت بخشیده و البته به دلیل کاشتن از خطاهای انسانی، دقت بالایی را نیز به همراه داشته است. در روند مطالعات و تحقیقات علمی، سادهترین آزمایشها در حوزه علوم دقیقه صورت میگیرند و پیچیدهترین مطالعات در علومانسانی. ولی حساسترین مطالعات در دایره علوم زیستی، مخصوصاً در آزمایشهای تشخیص افتراقی بیماریهای انسان انجام میشوند، چون بهنوعی موضوع حیات انسان است. در این گروه از آزمایشها، پاتولوژی و هیستوپاتولوژی از حساسیت بالاتری برخوردار هستند.
این مسئله موجب شده است که پروتکلهای دقیق و گامبهگام در انجام مطالعات و آزمایشهای این بخش تدوین شوند تا بتوان با بیشترین دقت و گاهی در کوتاهترین زمان به نتیجه صحیح دستیافت. بهکارگیری ابزاری به نام میکروتم نیز در همین راستا توسعهیافته است. در این مقاله با ما باشید تا بهصورت نمونه پروتکل آموزش برش با میکروتم را گامبهگام بررسی کنیم.
هدف
این پروتکل بهعنوان بخشی از روند مطالعات پاتولوژیک نمونه بافت تهیه شده از بیمار را در بر میگیرد. استفاده از میکروتم برای برش موفقیتآمیز بسیار مهم است. ابتدا باید پارافین احاطهکننده بلوک بافت بریده شود و سپس بلوک به نگهدارندهای که روی میکروتم نصب شده، محکم شود. اجازه بدهید فرض کنیم روند تهیه بافت، قالبگیری و پارافینه کردن انجام شده و ما کار را از مرحله نصب تیغه میکروتم و جاگذاری بلوک نمونه دنبال کنیم.
برش با میکروتم
برشزدن و تبدیلکردن بلوک نمونه با اسلایسها تحت عنوان Sectioning یا بخشبخش کردن تعریف میشود. این پروسه با استفاده از دستگاه میکروتم انجام میگیرد. کل پروسه میکروتمی نیز نامیده میشود. میکروتم موجب حرکت یک تیغه برنده در سطح بلوک پارافینه شده نمونه شده و یک سری مقاطع بسیار نازک از نمونه برش میزند. این مقاطع نازک برش زده شده را اسلایس یا ورقه هم مینامند. تهیه برش خوب به تجربه شخصی و آشنایی کامل تکنسین به وسایل مورد استفاده بستگی دارد؛ بنابراین تکنسینها برای این کار باید بهخوبی آموزش داده شوند. نتایج کار بهصورت عمدهای به حساسیت و عملکرد تیغ میکروتم بستگی دارد. پس هر تکنسین باید نحوه استفاده از تیغ میکروتم و نگهداری از آن را بهخوبی بداند. بهکارگیری صحیح میکروتم منجر به ضخامت یکنواخت و بسیار دقیق اسلایسها در حد چند میکرون میشود. این اسلایسها به ترتیب منظم و پشتسرهم درحالیکه لبه انتهائی یکی به لبه ابتدائی بعدی متصل است و معمولاً روبان هم نامیده میشود، برش خورده و از میکروتم خارج میشوند. میتوانید از این پروسه استفاده کنید:
- میکروتم را به طور صحیح تنظیم کنید
- بلوکهای پارافینه را مرتب کنید
- بلوکها را با استفاده از تیغ یکبار مصرف از قالب جدا کنید
- بلوک نمونه را روی پایه میکروتم بهگونهای ثابت کنید که محور طولی بلند آن بهموازات تیغ میکروتم قرار گیرد.
- تیغه برش میکروتم را در محل موردنظر به طور محکم ثابت کنید
- درجه زاویه تیغه را بهدقت تعیین و تنظیم کنید.
- تیغه میکروتم را در جای خود کاملاً محکم کنید
- آن قدر از سطح بلوک را برش دهید تا تمام سطح بافت در برابر تیغه میکروتم قرار گیرد
- حالا میتوانید برش نهائی را شروع کنید.
- با یک پنس اسلایسهای بریده شده را نگه دارید
- ریبون تهیه شده را روی سطح آب حمام شناورساز قرار دهید
- پس از اینکه اسلایسها صاف شدند آنها را بر روی لام منتقل کنید.
چالشهای مهم در برآیند برش با میکروتم
با ما همراه باشید تا چند چالش حین کار را با هم مرور کنیم.
-
چالش 1: انتخاب تیغه مناسب
برای شروع کار، متناسب با نوع بافت و کیفیت اسلایس درخواستشده، تیغه مناسب را انتخاب کنید. مراقب باشید که بلوک نمونه کلسیفیه شده یا نمونه دارای موی زیاد، موجب کندی تیغه و کاهش عمر آن میشود. درصورتیکه در حمام غوطهورسازی در اسلایسها پارگی یا رگهها را مشاهده کردید، باید تیغه تعویض شود
-
چالش 2: تنظیم زاویه برش
زاویه شیب تیغه در بهینهسازی برش از اهمیت بالایی برخوردار است. قطعاً یک تکنسین مجرب میداند که هر ضخامت اسلایس و هر نوع بلوک تهیه شده و نیز متد مورداستفاده به زاویه برش مناسب نیاز دارد؛ لذا پس از انتخاب تیغه دقت کنید که زاویه برش برای هدف مطالعه بهینه باشد.
برخی عوامل مؤثر در انتخاب زاویه تیغه عبارتاند از نوع میکروتم مورداستفاده، نوع تیغه مورداستفاده، میزان تیزی تیغه، میزان سفتی یا تراکم بافت، قطر مناسب اسلایس و…..البته پس از بهدستآمدن زاویه بهینه تیغه که معمولاً بین 3 تا 8 درجه است، سعی کنید تا حد امکان این زاویه تغییر نکند.
-
چالش 3: حفظ کیفیت اسلایس
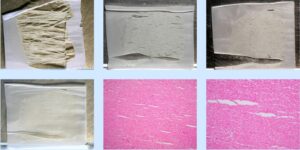
سعی کنید میکروتم را طوری تنظیم کنید که کیفیت اسلایسها فدای افزایش سرعت برش نشوند. این موضوع بسیار مهم است؛ زیرا مطالعه بافتها، مستلزم آشکارسازی جزئیات در اسلایسهای نهایی است. سعی کنید ابتدا چند برش از بافت انجام گیرد تا سطح بلوک نمونه به اندازه کافی براق شود. اگر سطح بهاندازه کافی براق نشود، اسلایس تهیه شده دارای ظاهری بیدزده و با خللوفرج فراوان خواهد بود.
یک اسلایس پاتولوژیک نهایی با ظاهر بیدزده

یک اسلایس پاتولوژیک نهایی با ظاهر بیدزده
-
چالش 4: کنترل عوارض یخزدگی
برای آمادهسازی نمونهها در برشهای منجمد، بلوک نمونه روی یک سطح بسیار سرد قرار میگیرد. در نتیجه هنگام اقدام به برش معمولاً نمونهها بسیار سرد هستند. سعی کنید هنگامی اقدام به برش کنید که روند ذوبشدگی سطح یخزده تازه شروع شده باشد. مراقب باشید که یخزدگی بلوک باعث ایجاد ترک در آن نشود.
نمونههایی از شکستگی در اسلایس تهیه شده
-
چالش 5: کنترل سرد بودن بلوک نمونه
همیشه سعی کنید قبل از اینکه بلوک نمونه به دلیل تأخیر در زمان برش نهایی مقداری گرما جذب کند، برشها را انجام دهید. افزایش حرارت بلوک نمونه ممکن است موجب افزایش بیش از حد فشردگی بافت نمونه شود.
-
چالش 6: برش را آهسته انجام دهید
برش سریع اسلایسها منجر به تخریب برشهای نهایی میشود. البته معمولاً این باور وجود دارد که برشهای ناقص هنگام شناورسازی در حمام بالا آمده و جدا میشوند. دقت کنید که برشها باید تاحدامکان به آرامی و یکنواخت صورت گیرد. از سرعت برش ثابت حدوداً یک دور در ثانیه استفاده کنید.
-
چالش 7: از آب تمیز در حمام غوطهورسازی استفاده کنید.
برای حفظ کیفیت اسلایسها پس از برش با میکروتم، از آب مقطر فاقد میکروب در حمام غوطهورسازی استفاده کنید. سعی کنید درجه حرارت آب بین 5 تا 15 درجه و پایینتر از درجه ذوب پارافین باشد. هر روز باید دمای آب حمام را چک کنید. آب داخل حمام غوطه ورسازی را حتماً بطور منظم عوض کنید.
اگر اسلایسها بیش از 15 ثانیه در حمام شناور باقی بمانند، پارافین ذوب میشود. ممکن است فکر کنید این سرعت روند کار را تسریع میکند ولی ممکن است منجر به آسیب به بافت یا نمونه شود.
معمولاً اسلایسها در حمام غوطهورسازی به صورتی قرار میگیرند که فاصله بین آنها با آب پر شود. اگر این لایه آب کاهش یافته یا به دلیلی حذف شود، منجر به آلایش یک اسلایس با اسلایس مجاور میشود. این اتفاق حتی میتواند منجر به تشخیص نادرست شود.
-
چالش 8: پایداری سطح کار را کنترل کنید
برای اینکه میکروتم هنگام کار دچار لرزش نشده و هنگام برش با میکروتم کیفیت اسلایسها از دست نرود، هنگام نصب میکروتم روی سطح میز کار و قبل از شروع برش با میکروتم، حتماً پایداری میز کار را چک کنید.
-
چالش 9: از تمیز بودن اسلایسها اطمینان حاصل کنید
قبل از شروع کار برش با میکروتوم، از تمیز بودن اسلایسها مطمئن شوید. مخصوصاً قبل از شناورسازی اسلایسها در حمام غوطهورسازی، از عدم احتمال آلودگی با سلولهای اسکواموس یقین حاصل نمائید.
-
چالش 10: چند بلوک را همزمان شناورسازی نکنید
پس از برش با میکروتم، اسلایسهای یک بلوک باید در حمام شناورسازی قرار گیرند. باید مراقب باشید که اسلایسهای چند بلوک همزمان در حمام شناورسازی قرار نگیرند. مخصوصاً اگر نمونهها از یک نوع باشند، ریسک خطر اشتباه در تشخیص ممکن است افزایش یابد.
-
چالش 11: مراقب چروکخوردگی اسلایسها باشید
نمیتوانید انتظار داشته باشید که اسلایسها هنگام شناور شدن در حمام شناورسازی کاملاً صاف و بدون چروک شوند؛ لذا لازم است هنگام برش با میکروتم سعی کنید اسلایسها دچار چینخوردگی نشوند. اگر هنگام برش با میکروتم این وضعیت برای شما پیش آمد توجه داشته باشید که دقت هنگام برش با میکروتم و افزایش اندکی در میزان درجه حرارت آب حمام شناورسازی ممکن است در حل مشکل به شما کمک کند.
-
چالش 12: مراقب باشید اسلایسها بیش از حد کشیده نشوند
یکی از چالشهایی که کاربر هنگام برش با میکروتم ممکن است با آن مواجه شود ایجاد کشیدگی بیش از حد (Over-expanding) در اسلایسها است. دلیل این امر میتواند وقوع تأخیر در انتقال اسلایسها از روی آب حمام شناورسازی بر روی اسلایدها باشد. بهعبارتدیگر قرارگرفتن اسلایسها در حمام شناورسازی سبب ایجاد صافشدگی آنها میشود که البته همراه آن تا حدی کشیدگی نیز در بافت اسلایس اتفاق میافتد؛ لذا باید مراقب باشید بلافاصله که از کفایت صافشدگی اسلایس مطمئن شدید، با احتیاط آن را بر روی یک لام یا اسلاید انتقال دهید. این مسئله هرچه بافت ظریفتر باشد بیشتر احتمال دارد اتفاق بیافتد مثلاً در مورد بافت لنفاوی
حرف آخر
موفقیت در فرایند برش با میکروتم یا همان میکروتمی در آزمایشگاه پاتولوژی شامل دو وجه مهم است. وجه آموزش و مهارت است که باید برای آن تلاش کنید و بعد تعهد به رعایت پروتکلها که میتواند ریسک کار را کاهش و احتمال موفقیت شما را افزایش دهد بر این دو وجه تمرکز کنید. جهت خرید تجهیزات پاتولوژی یا مشاوره رایگان با شماره 09121916608 و 09129153154 تماس حاصل فرمایید.
منابع
https://www.labce.com/spg605388_common_factors_affecting_sectioning_quality.aspx